// // Leave a Comment

How to Root Galaxy S4 I9505 on Android 4.2.2 Jelly Bean Official Firmware

Samsung Galaxy S4You can currently root Galaxy S4 I9505 – the Qualcomm snapdragon quad-core processor variant of the phone on Android 4.2.2 Jelly Bean. Chainfire, the root king on android for most of the Samsung devices have made it doable to root Galaxy S4 together with his CF-Auto-Root tool. We've got used this tool so as to root several of the android devices on Mytricksource, primarily as a result of it's one of the most unhazardous and simplest way to root your Samsung Android phones. You landing on this page suggests that you want to root Galaxy S4 I9505 on android 4.2.2 Jelly Bean and obtain the most out of the superb hardware Galaxy S4 comes with. Why must you root? Read: benefits of rooting associate android device. You'll root Galaxy S4 I9505 on Android 4.2.2 Jelly Bean official firmware victimization the tutorial below. Please note, this tutorial is not firmware dependent, so it will work with future android updates additionally.


Disclaimer: All the custom ROMs and firmwares, official software updates, tools, mods or something mentioned within the tutorial belong to their several owners/developers. We have a tendency to Mytricksource or the developers don't seem to be to be command accountable if you injury or brick your device. we have a tendency to don’t have you ever on gun purpose to do out this tutorial.

Root Galaxy S4 GT-I9505 LTE – CF-Root procedure Details:

A few vital things to note here. CF-Auto-Root method has been solely tested on XXUAMD2 Android 4.2.2 Jelly Bean Firmware  that may be a check firmware — not a final production package update. And this root method tutorial is only for the Galaxy S4 GT-I9505 (Qualcomm snapdragon Quad-Core processor with LTE) and will NOT work with other Galaxy S4 device like I9500.

CF-Root is that the root for “rooting beginners” and people who need to stay as near stock as attainable. CF-Root is meant to be utilized in combination with stock Samsung firmwares, and be the fastest and easiest method for your initial root. A modified recovery and cache partition will be flashed, which will install (only) SuperSU, then clean-up the cache partition and re-flash the stock recovery.

NOTE: Victimization this root increases your flash counter. You should run Triangle Away once growth to reset the counter. Note that if you want to run custom kernels or custom recoveries, your flash counter will be set to one at every boot. Either configure Triangle Away to reset the counter at every boot (Play version only) or only reset the counter once you have to be compelled to get into pledge.

Samsung Galaxy S4 USB Drivers

You will have to be compelled to connect your Android phone with the PC. For that, please check that you've installed the USB drivers for Samsung Galaxy S4 properly. If not, you'll be able to download the newest official drivers from our Android USB Drivers section here:
Download Samsung Galaxy S4 USB Driver

Backup and Other Important Tips

Always backup your important data that you might need after you install a new custom ROM, an official software update or anything else. Make a backup for just in case, you never know when anything might go wrong. See below for some tips on how to backup data:
       Samsung users can also back up data using Samsung KIES. If you backup data manually, you get more options what to choose from and it is very easy to move data across Android devices from different manufacturers, i.e moving Samsung Galaxy S3 backup data to HTC One X.
          If you already have a custom recovery (ClockworkMod, TWRP etc.) installed on your phone, we strongly recommend a backup using that as it creates a complete image of your existing phone set up.

      A few more optional tips that you should remember:

              1. Having problems connecting your Android phone to the computer? You need to enable USB debugging mode.

              2. Make sure your Android device is charged up to 80-85% battery level. Why? Because, if your phone goes off suddenly while installing a custom ROM, flashing an official firmware update or installing mods etc. — your phone might get bricked or go dead permanently. No one wants that, right?

              3. Most of the tutorials and how-to guides on MyTrickSource are for factory unlocked Android phones and tablets. We recommend NOT to try our guides if your phone is locked to a carrier, unless we have specified the carrier name or device model.


      If you discover the on top of tips helpful and that they were useful to you, please think about giving us a +1 or LIKE on facebook to impart us!

      All set and ready? Sensible. Now, let’s proceed with the tutorial below and Root Galaxy S4 I9505 on Android 4.2.2 Jelly Bean Official Firmware.

      How to Root Galaxy S4 I9505 on Android 4.2.2 Jelly Bean Official Firmware

      We have place along in depth piecemeal directions orient a way to Root Galaxy S4 I9505 on Android 4.2.2 Jelly Bean Official Firmware. If you are utilised to installing authorized updates through ODIN on Samsung Galaxy apparatus, then this should not be any distinct for you.

      Please read every line mindfully and make certain you read the tutorial one time before actually accomplishing it on your Android apparatus. 

      To recall:

      • This Root procedure tutorial is only for Galaxy S4 I9505 (LTE, Qualcomm Snapdragon Quad-Core CPU). Please do not try on any other Galaxy S4 variants.
      • Make certain you backup all your data, facts and figures in your phone before advancing as a precaution.
      • This Root procedure works with Android 4.2.2 firmwares and all future Android updates as well.
      • Your Galaxy S4 should be on an authorized firmware by Samsung, not a Custom ROM.

      Entire Step-By-Step directions:

      Step 1 - Download CF-Auto-Root Android 4.2.2 Package for Samsung Galaxy S4 to your computer and extract the zip file.

      Step 2 - Download ODIN v3.07 which will help you to Root Android 4.2.2 on Samsung Samsung Galaxy S4 I9505.


      Step 3 - Switch OFF your phone. Now proceed to Download Mode. How? Press and hold the Volume Down + Home buttons together, and then press the Power button till you see the building Android robot and a triangle. Press Power again to confirm to go in into Download Mode.

      Step 4 - Make certain you have your Samsung Galaxy S4 USB drivers installed on your computer.

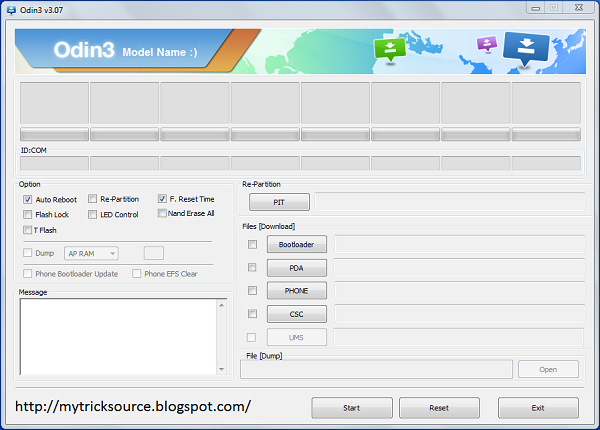
      Step 5 - Open ODIN on your computer. Attach your phone to your computer while your phone is in the Download Mode.

      Step 6 - If your phone is connected effectively, one of the ID:COM boxes will turn yellow with the COM port number. This step might take some time.

      Step 7 - Now choose the file that you have to flash/install on your Android phone. This file will be found from the extracted file in Step 1.
      • Click on ‘PDA’ and choose the file "CF-Auto-Root-jflte-jfltexx-gti9505.zip".
      Step 8 - In ODIN, ascertain the Auto Reboot and F. Reset Time choices, if not already.

      Step 9 - Now click on the Start button in ODIN. Setting up process will start and would take a couple of minutes to entire.

      Step 10 - After the setting up is accomplished, your Android phone will reboot into Recovery Mode automatically and install the root package / files. Your ID:COM box will also turn green.

      Step 11 - After you see the home screen, unplug your phone from the computer.

      NOTE: Occasionally the apparatus does NOT boot into Recovery Mode automatically (as granted in Step 10) and root your apparatus. If that occurs, do the entire method again.

      OPTIONAL: Still not fixed? One time afresh present the whole tutorial, but make certain in ODIN, the “Auto Reboot” choice is NOT checked. Then after installation (Step 10), do the following:

      Step 11 - Drag out the Phone's electric battery to turn OFF the phone vigorously.

      Step 12 - Now boot (turn ON your phone) with Volume Up + Home + Power buttons to go exactly into Recovery Mode manually. This will start the install method of rooting your phone.

      That’s it! Your Samsung Galaxy S4 has currently been rooted on Android 4.2.2 official software package update. Check for the SuperSU app in your apps list to verify.

      To make positive you've got properly put in the higher than root methodology and it’s operating, verify with Root Checker as given within the link.

      Hit +1 or Like on Facebook to give thanks us!
      If you run into any issues, be happy to drop us a comment below and that we can reply you back ASAP with the fix or the answer to your drawback.
      Read More
      // // Leave a Comment

      Top 5 Android Games All Time

      1. Temple Run
      This game was developed by Imangi Studios. It has become very popular. This popularity has been boosted by its simple missions, gameplay and the incredible motive of keeping on running. It allows you navigate through ruins and cliffs by jumping, sliding, tilting and turning. It also gives the player a chance to pick coins so as to unlock exciting powers, abilities and characters.
      Temple Run 2 1.8 APK for AndroidDownload Now!
      Temple Run

      2. Subway Surfers

      This is a product of Sybo Games and Kiloo Games. It is based on running skills of Jake on train tracks. As Jake runs on these train tracks, he is chased by both a dog and the station officer. He also has another challenge which is an incoming train. To overcome these challenges the gamer finds makes Jake slid, shift and jump in a very colorful environment. The game allows you to collect shiny gold coins to use in upgrading power ups such as super sneakers, jetpacks and coin magnet.


      Subway Surfers
      3. Agent Dash
      The gamer acts as Agent Dash and the mission is sprinting as far as possible through hazardous environment of the enemy. It has a spy-like soundtrack and beautiful animations. Agent has to leap, sidestep and slide below incoming obstacles like falling trees, laser beams, fiery lava and skidding trucks. As he does this he has to collect stray diamonds to use in purchasing new gadgets and unlocking other agents.


      Agent Dash
      4. The EndApp
      This game employs the basic skills of running for a long duration. It features an endless runner. The environment offers striking looks and urban hazards. The runner comes across barriers like jack-knifed trucks, lava pits, broken car, and cracked cement. Then runner also comes across ramps which help him cover longer distances. It offers 28 days each day having 5 challenges. For more details about these games, you can contact the PlayStation helpline.


      The EndApp
      5. Rail Rush
      This is a product of Miniclip.com. It is an on-the-move game which is set in underground mines. The gamer explores six diverse surroundings among them waterfalls, dead cities, caverns, mushroom halls and spider nests while riding on a cart. He does this while swiping and tilting in order to avoid obstacles and signals found on a rail track. Some of the missions involve jumping up a total of twenty times in a game or dying in the dead city five times in a game. The gamer is allowed to pick gold nuggets which he/she uses to buy power ups for the cart e.g. Iron Grid and super magnet force. Also another e.g. is buy TV product at discount. One can also pick Rock Eggs which gives him/her extra nuggets to complete the exploration.


      Rail Rush

      Though if you have rooted Android device, then you can download apk from many online shopping website. Also you may check Play Store by Google to check out trending games every day!
      Read More
      // // Leave a Comment

      How To Setup, Configure, and use Google Now

      There’s some disarray out there in the Android world. Google Now is not Android’s “Siri killer”, that’s Voice Search (which you can get to and use from within Google Now). Google Now is much, much more than an submission that listens to queries and spits out responses. I’m not even sure we can call Google Now a virtual assistant either. Google Now is about automating your life and in return, making your life simpler. Google Now does that by providing a huge allowance of data, pertinent to you, at your fingertips. There’s just one apprehend though. Those of your that often proceed full tin foil head covering mode actually won’t be adept to completely relish Google Now to its’ full potential. So take off your head equipment and let’s get started.

      Google Now

      Google Now notifies you today’s climate before you start your day, how much traffic to expect before you leave for work, when the next train will arrive as you’re standing on the platform, or your favorite team’s tally while they’re playing. And the best part? All of this occurs automatically. Cards emerge all through the day at the instant you need them.

      How to setup Google Now

      To get begun, you’ll first need to launch Google Now from either your Lock Screen display by swiping up in the direction of the ‘Google’ icon or by swiping up from any of your soft keys. You can press in and swipe up from the back arrow, home key, and recents key.


      If you haven’t commenced Google Now until…now… you’ll need to tap through the welcome screen setup.

      Now move and scroll down the to terribly bottom and faucet the three dots (menu button) within the bottom right corner. This will launch the Google now / Voice Search settings. Faucet Google now to customise your Google now cards.


      You can additionally see a Sample Cards and configure them from the Google now home screen. Scroll all the means all the way down to very cheap and faucet “Show sample cards”.


      Most of you may in all probability have to be compelled to leave these settings set to default till you get a higher sorrow for Google now and what info you want to own at your fingertips, while not having to dig through your phone. Now that you just have your cards setup, you would like to populate them with some data. You'll do this by exploitation Voice Search. You'll faucet the microphone icon and rummage around for your favorite sports team, weather, restaurant, flight numbers, or something associated with the sample cards provided for you.

      For example: “What’s the weather today?” “Do the Justin’s play today?” “I’m hungry for Italian food”. You get the concept.

      Now you privacy of us you’ll have to be compelled to take away your tin foil hats for consequent half. As I aforesaid earlier, to completely get the foremost of Google now, you’ll have to be compelled to setup some a lot of tasks revolving around your location.

      For your location settings, initial head into the Google now settings and faucet Privacy accounts. By default, all of those settings ought to be enabled.


      Next, faucet Manage location settings. this will take you into Maps settings. For best results, you’ll need location history enabled.


      Next, in order that Google now will determine your home and work address properly (instead of your favorite place to hangout) launch Maps. currently choose Location history. From here you’ll have the choice to set up your home and work locations. (Yes, I work quite twenty one hours every week on the average. My building at work doesn’t offer the best GPS window.)

      Now you have got Google now setup and prepared to point out you some cards. you must begin seeing cards straight off for weather, distance to figure / home, and presumably alternative locations. If you’re close to a terminal you will see that data populate directly additionally. As mentioned earlier, you’ll wish to start out mistreatment Voice Search and checking out alternative card connected things to let Google now apprehend you’re interested. once you begin golf shot data into Google now, you’ll begin to examine cards show up in your notifications. simply faucet on them to look at them or at anytime you'll be able to swipe up from your soft keys or home screen.

      Suggestion's and Tricks

      Once you shut or swipe away a card in Google now or from your notifications, it isn’t gone, don’t worry. it'll return succeeding time data for that card changes. For example: if you swipe away your weather, it won’t return till your location changes or your weather info changes.

      You can force cards to appear by sound the menu icon at very cheap of Google now and tapping the refresh button. If you’re still having issues, you'll continuously enter Google now settings, flip the toggle switch off, reboot, then re-enable Google now. You shouldn’t ought to do that although.

      Add locations to your Calendar events. Google now can then provide you with a notification once you ought to leave to arrive on time.

      If you’ve used Latitude to arrival to several businesses in your space, you'll begin to check those show up in Google now. If you simply swipe those away, they’ll keep returning. once these cards area unit shown, you have got the choice to not track those places by sound the settings.

      Enabling internet History drastically improves the practicality of Google now. you'll management these settings at www.google.com/dashboard.

      Watch Introducing Google Now Video by Google 


      Finally, the additional more you utilize Google now, the higher it becomes. Enjoy! Strike one Like on Facebook or 1+ to Thank US!
      Read More
      // // 2 comments

      How to Enter Recovery Mode on Any Android Device

      Recovery mode in Android presents a number of added actions that you can present on an Android phone and tablets. You can manually install System updates, wipe data / factory reset or wipe cache partition. And if you have a Custom recovery installed on your phone, you get more options to install Custom ROMs, present Nandroid backups and even modify your phone with diverse system fine-tunes.


      You can get access to recovery mode with diverse methods. We favour the hard way by running the ADB order from our computers, but there are easier procedures as well. First, you can get access to to recovery mode by pushing the key blend on an Android device (i.e. Volume Up + Power buttons) or by rebooting into Recovery Mode utilising an app.

      Procedure 1: How to go in Recovery Mode with Android App [Root Needed]

      We will be following the app procedure underneath for quickly accessing the recovery mode. It is actually easy and hardly engages any steps other than establishing the needed app on your Android phone.
      NOTE: This app needs root access. Do not install if you do not understand what is root get access to. If you do not have root get access to, read underneath for method 2.


      Quick Boot

      Step 1 - Download Quick Boot from Google Play Store and install it.

      Step 2 - Open the app, you will see 4 choices: Reboot, Recovery, Bootloader, Power Off.

      Step 3 - Just tap on ‘Recovery’ and you phone will reboot into Recovery Mode automatically.
      Easy, isn’t it? This is by far the easiest procedure to get into Recovery Mode if you do not understand the exact key blends for your Android device.

      Procedure 2: How to go in Recovery Mode with ADB

      This is another procedure how you can go in recovery mode on your phone. You can use this procedure when you do not understand the direct key blend or don’t have root access to effortlessly enter recovery mode utilising the app cited overhead.

      Step 1 - Make certain ADB and Fastboot is configured on your PC. This is important.

      Step 2 - Attach your Android device to your PC with a USB cable and install ADB drivers (if needed).

      Step 3 - Navigate to android-sdk-windowsplatform-tools directory and open Command punctual (Shift + Right-click anywhere in the folder > Open Command Prompt).

      Step 4 - Type in the following command and press Enter.

                                adb reboot recovery

      Step 5 - Your Android device will turn OFF and then boot into the recovery mode. Navigate up and down utilising the volume keys.

      If you need any help considering this, seem free to drop us a commentary underneath and we will reply back as shortly as possible.
      Read More
      // // Leave a Comment

      Transfer Data between Phone, iOS, Android with Bump

      This is the Guest Post by Kartik Saibal. If you want to Post your article here, then see our Guidelines on Guest Posting Authority in My Trick Source.
      Bump is the simplest way to use your phone to combines with other ones in the real world. Bump Team begun Bump to explain a major difficulty with wireless phones as powerful as they have become, they are still attractive ineffective for combining in the genuine world, with genuine persons, locations, and things. Bump group are changing that. Bump was born as a simple iPhone app for swapping communicate data conceived by their three founders, but as Bump group user groundwork increased, so did their dream. Bump group now have more than 115 million downloads, and a dream of altering the way people use their mobile devices. Bump group includes some of the smartest and most talented developers and designers in Silicon Valley, and Bump group all share a widespread goal to build something persons desire and have joy doing it. Bump was part of Y Combinator's summer 2009 batch, and their development has been fueled by some of the Valley's peak investors and VCs, like Ron Conway, Ram Shriram, Sequoia Capital, and Andreessen Horowitz. Bump group are founded in downtown Mountain outlook, the epicenter of Silicon Valley, meagre steps from Caltrain to San Francisco.


      Here we are with a completely amazing software through which you can transfer almost all the data of your phone to iOS to Android and vice-verse.
      Bump is really something 'Next Gen' the technology and the Brains involved in it are simply marvelous.You might not be clear as to what we mean but all your confusions would get resolved after reading the whole tutorial. ;-)

      Step 1: To initiate the connection between 2 device, place the devices close to each other and Bump The Devices Together (yes we have to go by what the name says) and bump will establish a  secure connection.

      Step2: Once The link has been created Accept/Deny the connection.

      Step3: After both the devices have successfully been 'Bumped' (connected) the data transfer will begin.

          What more you can also share your contacts/photos and pictures. Just Follow the on screen instructions and you'll be good to go ;)

      Furthermore see: 

      About Author:

      Kartik Sibal is a passionate blogger from Tricky Crunch  who enjoys writing articles on Technology, Android and IOS niche. He is our new Guest Author and Article writer of all blogs under our network.
      Follow him @ Twitter | Facebook

      Read More
      // // Leave a Comment

      Update HTC One X to Android 4.2.2 CM10.1 RC2 Jelly Bean Custom Firmware

      HTC One X users ought to be happy regarding this Android 4.2.2 CM10.1 RC2 Jelly Bean custom ROM that's currently accessible for this phone, all due to the CyanogenMod team  that has worked on the CM10.1 RC2 firmware. We've got coated plenty of AOSP based mostly custom ROMs for the HTC One X, however we tend to all conform to the purpose that nothing is best than the CyanogenMod ROMs. They're stable, powerful and really speedy in performance and overall usage. You'll be able to update HTC One X to CM10.1 RC2 Android 4.2.2 Jelly Bean custom firmware victimisation the tutorial below. This can be not an official firmware by HTC, however simply a custom ROM that's supported the newest AOSP unharness and would need a custom recovery like ClockworkMod so as to flash the ROM zip and Google Apps zip files on your phone. Confirm your HTC One X bootloader is unlocked otherwise you won’t be able to install custom ROMs.
      HTC One X
      As you continue reading, we'll tell you the ways to put in CM10.1 RC2 Android 4.2.2 Jelly Bean custom firmware on HTC One X. All the steps and directions are given below, and that we have additionally given many additional tips that you simply have to be compelled to confine mind before continuing. Make certain you backup all of your existing data within the phone before continuing as this tutorial can wipe out all of your internal storage data. The subsequent tips are vital as they're going to facilitate the installation procedure to travel swish with none problems. Let’s get to the tutorial currently.

      Disclaimer: All the custom ROMs and firmwares, official software updates, tools, mods or something mentioned within the tutorial belong to their several owners/developers. We have a tendency to Mytricksource or the developers don't seem to be command accountable if you injury or brick your device. We have a tendency to don’t have you ever on gun purpose to do out this tutorial.

      CM10.1 RC2 Android 4.2.2 Jelly Bean custom ROM Details:

      NOTE: Since this can be a nightly build, certify you recognize that once putting in this firmware update, your Android device will get FC errors, boot loops, many alternative bugs, apps won't work or worse, your phone won't boot. To fix, you may need to install  stock firmware or the other stable custom ROM.

      There are heaps of useful articles and how-to guides on Mytricksource for the HTC One X, however we expect you may have an interest within the following posts:
      Like this CM10.1 RC2 ROM based on the newest Android 4.2.2? We tend to am passionate about it too and we understand you're looking forward to install it on your phone currently. Currently please read below for necessary tips on the way to check that your installation goes smooth and you do not find yourself with any problems.

      HTC One X USB Drivers

      You will have to be compelled to connect your Android phone with the PC. For that, please check that you've installed the USB drivers for HTC One X properly. If not, you'll be able to download the newest official drivers from our Android USB Drivers section here:
      Download HTC One X USB Driver

      Backup and Other Important Tips

      Always backup your important data that you might need after you install a new custom ROM, an official software update or anything else. Make a backup for just in case, you never know when anything might go wrong. See below for some tips on how to backup data:
           Samsung users can also back up data using Samsung KIES. If you backup data manually, you get more options what to choose from and it is very easy to move data across Android devices from different manufacturers, i.e moving Samsung Galaxy S3 backup data to HTC One X.
              If you already have a custom recovery (ClockworkMod, TWRP etc.) installed on your phone, we strongly recommend a backup using that as it creates a complete image of your existing phone set up.

          A few more optional tips that you should remember:

                  1. Having problems connecting your Android phone to the computer? You need to enable USB debugging mode.

                  2. Make sure your Android device is charged up to 80-85% battery level. Why? Because, if your phone goes off suddenly while installing a custom ROM, flashing an official firmware update or installing mods etc. — your phone might get bricked or go dead permanently. No one wants that, right?

                  3. Most of the tutorials and how-to guides on MyTrickSource are for factory unlocked Android phones and tablets. We recommend NOT to try our guides if your phone is locked to a carrier, unless we have specified the carrier name or device model.
          If you discover the on top of tips helpful and that they were useful to you, please think about giving us a +1 or LIKE on facebook to impart us!

          All set and ready? Sensible. Now, let’s proceed with the tutorial below and update One X to CM10.1 RC2 Android 4.2.2 Jelly Bean custom firmware.

          How to Install CM10.1 RC2 Android 4.2.2 Jelly Bean on HTC One X

          We have place along in depth piecemeal directions orient a way to install CM10.1 RC2 Android 4.2.2 Jelly Bean custom firmware on HTC One X. If you're accustomed in installing custom ROMs on your HTC One X, then this could not be any totally different for you.

          However, for beginners, you wish to root your HTC One X and install a custom recovery. Please Google that up if you're unsure and confirm you read the tutorial once before truly acting it on your device.

          To Remember:
          • This CM10.1 RC2 Android 4.2.2 Jelly Bean tutorial is simply for HTC One X. Please don’t do that on the other variants of the phone.
          • Make sure you backup all of your data in your phone before continuing.
          • This is not an official HTC software package update. This can be a custom third-party ROM.
          • Bootloader ought to be unlocked.
          • Make sure ClockworkMod Recovery is installed in on your phone.

          Entire Step-By-Step directions:

          NOTE: Make certain ADB and Fastboot is configured on your PC. How? Glimpse here: How to Set Up ADB and Fastboot with Android SDK.

          Step 1 - Download CM10.1 RC2 Android 4.2.2 ROM for HTC One X to your computer and extract boot.img from the zip file individually. Download Google Apps as well.

          Step 2 - Connect and mount on your HTC One X USB (mass) memory on your computer using the USB twisted cord.

          Step 3 - Now copy/paste the downloaded Android 4.2.2 ROM zip and Google Apps zip file to your SD card. Make certain the files are in the SD card root (not in any folder).

          Step 4 - Copy/paste the boot.img file to android-sdk-windowsplatform-tools directory.


          Step 5 - Then turn OFF your Android phone.

          Step 6 - Now to get in the Bootloader/Fastboot Mode. Turn ON the phone while pressing and holding the Volume Down + Power buttons.

          Step 7 - Once in the Fastboot mode (on your phone), navigate to android-sdk-windowsplatform-tools directory (on your computer) and open Command Prompt (Shift + Right-click > Open Command Prompt).

          Step 8 - Type the following command and press Enter.


          fastboot flash boot boot.img

          Step 9 - Then, type the following command and press Enter.

          fastboot reboot


          Step 10 - Follow the navigation instructions on the screen. Select BOOTLOADER and then go to RECOVERY. Alternatively, read this: How to go in Recovery Mode on Any Android Phone.

          Step 11 - Once you are in ClockworkMod Recovery, select perform a full data wipe by selecting “wipe data/factory reset” Use the Power button to select everything while in the Recovery Mode.

          Step 12 - Then, perform a cache wipe by selecting “wipe cache partition”
           
          Step 13 - Now this is optional, but it is recommended to perform a wipe of your dalvik cache as well. You will not get into boot loops or any other errors. From CWM recovery, go to ‘advanced’ and then select “wipe dalvik cache”.


          Step 14- Then go back to the main recovery screen and select “install zip from SD card”.
           

          Step 15 - Now select “choose zip from sdcard”. Using your volume keys, navigate to the Android 4.2.2 ROM zip file that you copied to your SD card and select it using the Power button. Confirm the installation on the next screen and the installation procedure should start now.


          Google Apps: Replicate the overhead step for the Gapps zip file as well and install it on your phone.


          Step 16 - After the installation completes, go to “+++++Go Back+++++” and reboot the phone by selecting “reboot system now”


          Your HTC One X will boot now and it might take about 5 minutes to boot on your first time. So, delight delay.

          That’s it! Your HTC One X should now have CM10.1 RC2 Android 4.2.2 Jelly Bean custom ROM installed on your phone! Proceed to setting > About phone to verify.

          Strike +1 or LIKE on facebook to express gratitude us!

          Have joy playing with it! If you have any issues, please blaze them up in the remarks below!
          Read More
          // // Leave a Comment

          Customize Android Phone with SPB Shell 3D Animated

          Do you wish to relish 3D panels and 3D animated widgets? Rework your  Android homescreen into 3D with the SPB Shell 3D launcher on your  Android device. This app options 3D panels and superb 3D animated widgets on your  Android homescreen.

          SPB Shell 3D
          Image credit: Android Play Store

          Unlike the same old launcher that separates every section of the house screen into pages, this launcher helps you to insert panels on your  Android homescreen. Every panel has its own specific perform. For example, the weather panel helps you to see the weather for the day. You'll quickly read your agenda and schedules with the Calendar panel. You will not miss a birthday once you are looking at the birthday convenience on the folks panel. you'll additionally add extra panels for pictures, contacts, time, market, and far a lot of.

          Panels don't seem to be the sole cool addition during this launcher. The launcher additionally helps you to read and scroll between panels in 3D by sound the center button on the dock bar. What is a lot of is that the launcher additionally options superb 3D effects on its widgets. You'll see a pop moon, 3D preview of your messages, a 3D clock, a 3D cake, and far a lot of.

          With all those made 3D animations, you'll need to quit associate degree quantity of regarding US $15.00 before you'll use the launcher. But, with all those swish 3D animations and show, I might say that this launcher is certainly value paying for. If you are looking for downloading SPB Shell 3D apk for free, don't worry i will share it in this post.

          Requirement for Customize Android Phone with SPB Shell 3D Animated

          How to Install SPB Shell 3D on Android by Mytricksource way

          Step 1 : First you have to install Luckey Patcher apk on your Android Phone. Do not install SPB Shell 3D apk on first.

          Step 2 : After installing Lucky Patcher apk, go back again and Install SPB Shell 3D apk.

          Step 3 : Press Home button and check for Use by default for this action.

          Step 4 : Select SBP Shell 3D home instead of Samsung Home.

          Now you are all done! Only 1 thing left to do now. So go to SD Card and Open Jarvis Wallpapper for SPB Shell 3D png image. Set it as a Home screen wallpaper.

          That's it! Hit one Like on facebook or 1+ to thank us!


          You may also like to see:

          Need Help?

          If you run into any problems during Customizing your Android Phone with SPB Shell 3D,  feel free to drop us a comment below and we will reply you back ASAP with the fix or the solution to your problem.
          Read More
          // // 1 comment

          Install Official XenonHD Android 4.2.2 on Galaxy S4 I9505 Custom Firmware

          Samsung Galaxy S4 receive new Official XenonHD Android 4.2.2 Jelly Bean custom Rom update. This is an another custom ROM for Galaxy S4 I9505 came with a lots of new features and designs. You can now easily update  Galaxy S4 I9505 to Official XenonHD Android 4.2.2 Jelly Bean which is a custom Rom based on official Android 4.2.2 .  Like always, we have the tutorial on how to install this firmware on your phone with the most easy instructions. This Custom Rom is Developed by Team Horizon.  So all credit goes to them. As you continue reading below, we will guide you through the entire process of how to install  Official XenonHD Android 4.2.2 Jelly Bean Custom Rom on Galaxy S4 I9505 using CyanogenMod. Don’t forget to backup all your apps and personal data as a precaution. It is always better to make a backup before doing anything with your Android device. This is an Official Custom firmware update by Team Horizon and their developers,  a modified custom ROM.

          Official XenonHD on Galaxy S4 I9505

          The following tips are important as they will help the installation procedure to go smooth without any issues. Let’s continue with the tutorial now.

          Disclaimer:  All the custom ROMs and firmwares, official software updates, tools, mods or anything mentioned in the tutorial belong to their respective owners/developers. We (MyTrickSource) or the developers are not to be held responsible if you damage or brick your device. We don’t have you on gun point to try out this tutorial.

          Official XenonHD Features:

          • JB 4.2.2 JDQ39E
          • Rooted
          • Busybox
          • Advanced settings
          • Halo
          • QuickMessage and Reply.
          • Custom notification vibrate patterns.
          • Timestamp options.
          • Input type selection.
          • Add reminder to calendar.
          • Templates functionality.
          • Split SMS functionality.
          • Emoji and Strip unicode support.
          • T-9 Dialer and with other stuff.
          • Dialpad settings.

          Miscellaneous:

          • Add reboot and screenshot options to power menu.
          • Additional tiles in Quick Settings.
          • Theme Chooser support. (Updated for 4.2)
          • Volume rocker wake. (Settings>Display)
          • Volume rocker long press to seek tracks. ("")
          • Show rotation lock in quick settings.
          • Bluetooth Message Access Profile support.
          • Improved scrolling cache.
          • Fixed December bug.
          • Fixed Google location service.
          • Add an option to change the device hostname.
          • New moto style softkeys.
          • DSPManager added with all the binaries. 
          • Apollo Music player added and fixed for JB.
          • Added XenonHD wallpapers.
          • Louder output on speaker for Maguro and Toro.
          • Added Galaxy4, PhaseBeam and Holo spiral wallapers.
          • Run sysinit during boot.
          • Change sysfs permissions to allow user control ksm.
          • Wi-fi scan time to 100 to save battery.
          • Performance, battery life and other misc tweaks.
          • Init.d support with added tweaks and scripts.
          • SuperSU application for root.
          • CMFile manager added.
          • GPS, Camera, Keyboard gestures fixed.
          • Build.prop tweaks.
          • Battery life tweaks.
          • And many more..
          Like this Official XenonHD based on the latest Android 4.2? We love it too and we know you are looking forward to install it on your phone now. Now please read below for important tips on how to make sure your installation goes smooth and you do not end up with any problems.

          Backup and Other Important Tips

          Always backup your important data that you might need after you install a new custom ROM, an official software update or anything else. Make a backup for just in case, you never know when anything might go wrong. See below for some tips on how to backup data:
               Samsung users can also back up data using Samsung KIES. If you backup data manually, you get more options what to choose from and it is very easy to move data across Android devices from different manufacturers, i.e moving Samsung Galaxy S3 backup data to HTC One X.
                  If you already have a custom recovery (ClockworkMod, TWRP etc.) installed on your phone, we strongly recommend a backup using that as it creates a complete image of your existing phone set up.

               A few more optional tips that you should remember:

                      1. Having problems connecting your Android phone to the computer? You need to enable USB debugging mode.

                      2. Make sure your Android device is charged up to 80-85% battery level. Why? Because, if your phone goes off suddenly while installing a custom ROM, flashing an official firmware update or installing mods etc. — your phone might get bricked or go dead permanently. No one wants that, right?

                      3. Most of the tutorials and how-to guides on MyTrickSource are for factory unlocked Android phones and tablets. We recommend NOT to try our guides if your phone is locked to a carrier, unless we have specified the carrier name or device model.

              If you find the above tips useful and they were helpful to you, please consider giving us a +1 or LIKE on facebook to thank us!

              All set and ready? Good. Now, let’s proceed with the tutorial Below and update Galaxy S4 I9505 to Official XenonHD Android 4.2.2 Jelly Bean Custom ROM.

              How to Install Official XenonHD Android 4.2.2 Custom Rom in Galaxy S4 I9505

              Galaxy S4 I9505Galaxy S4 I9505

              We have put together a detailed step-by-step instructions guide on how to install Official XenonHD Android 4.2.2 Jelly Bean Custom firmware on Galaxy S4 I9505. If you are used to installing custom ROMs on your Galaxy S4 I9505, then this should not be any different for you.
              However, for beginners, you need to root your Samsung Galaxy S4 and install a custom recovery. Please Google that up if you are unsure and make sure you read the tutorial once before actually performing it on your device.

              To Remember:
              • This tutorial is only for installing Official XenonHD Android 4.2.2 Jelly Bean ROM on Samsung Galaxy S4 I9505.  Please do not try on any other Galaxy variants.
              • Your phone should be rooted and have ClockworkMod recovery installed from before. See here: How to root Galaxy S4 I9505
              • This tutorial will wipe out all your data. Proceed at your own risk.
              • Perform a Dalvik Cache wipe before proceeding from the recovery mode.
              • Samsung KIES will NOT detect your phone after installing this ROM because it is a custom firmware.
              • Make sure you backup all your data in your phone before proceeding.

              Complete Step-By-Step Instructions:

              Step 1 - Download Official XenonHD Custom firmware and Google Apps for Galaxy S4 to your computer.

              See original Source here: Official XenonHD Android 4.2.2 On Galaxy S4 I9505

              Step 2 - Connect and mount your Galaxy S4 USB memory on your computer using the USB cable.

              Step 3 - Now copy/paste the downloaded Official XenonHD zip file to your SD card. Make sure the file is in the SD card root (not in any folder).

              Step 4 - Then turn OFF your phone and disconnect from the USB cable.

              Step 5 - Now to get in the Recovery Mode. Switch ON the phone while pressing and holding Volume Up + Home + Power buttons together. You will get an exclamation mark now. Again, hold your Volume Up + Power buttons. You should now be in your Recovery Mode.

              Step 6 - Once you are in ClockworkMod Recovery, select perform a full data wipe by selecting “wipe data/factory reset”  Use the Power button to select everything while in the Recovery Mode.

              Step 7 - Then, perform a cache wipe by selecting “wipe cache partition” as you can see in the image below.

              Step 8 - Now this is optional, but it is recommended to perform a wipe of your dalvik cache as well. You will not get into boot loops or any other errors. From CWM recovery, go to ‘advanced’ and then select “wipe dalvik cache”.

              Step 9 - Then go back to the main recovery screen and select “install zip from SD card”.

              Step 10 - Now select “choose zip from sdcard”. Using your volume keys, navigate to the Official XenonHD file that you copied to your SD card and select it using the Power button. Confirm the installation on the next screen and the installation procedure should start now.

              Step 11 - After the installation completes, go to “+++++Go Back+++++” and reboot the phone by selecting “reboot system now
               Note: Repeat the same step of installation as in step 10 with Google Apps after installing Official XenonHD.
              Your Galaxy S4 I9505 will boot now and it might take about 5 minutes to boot on your first time. So, please wait.
              That’s it! Your Galaxy S4 should now have Official XenonHD Android 4.2.2 Jelly Bean Custom Rom installed on your phone! Go to Settings > About phone to verify.

              Need Help?

              If you run into any problems during Updating Galaxy S4 I9505 to Official XenonHD Android 4.2.2 Jelly Bean Custom ROM,  feel free to drop us a comment below and we will reply you back ASAP with the fix or the solution to your problem.
              Read More